Category: Mac


One of my frustrations since moving from using VMWare Workstation on a Linux desktop to using VMWare Fusion on a Mac, is the inability of the latter to select a physical device as a hard drive. For example, in VMWare Worsktation I could select, say, /dev/sdc as a disc device, which would allow me to boot off an external disc, or run a bootable diagnostic CD on the OS drive for another computer, for example a laptop that doesn’t have a optical drive.

But fear not: VMWare Fusion can deal with raw discs. It just doesn’t have the option in the graphical user interface. Here’s what to do:

1. Plug in the external disc and open Disc Utility.

2. In the left hand pane, click on the external disc entry, then click on info

3. Look for the “Disk Identifier” field and note the value. In my case, it is “disk4”

4. The next step requires that you know where your VMWare Library is stored. In my case, I have two drives in my Mac, and the second is where my VMWare resides, so /Volumes/DATA/VMWare. I created a subfolder for external discs, /Volumes/DATA/VMWare/External.

5. Armed with the information discovered in steps 3 and 4, open the terminal and run the following (all in one line):

/Applications/VMware\ Fusion.app/Contents/Library/vmware-rawdiskCreator create /dev/disk4 fullDevice /Volumes/DATA/VMware/External/external_drive ide

6. Make sure VMWare is closed. In Finder, open your VMWare library, right click on your virtual machine file (in my case WindowsXP), and choose “Show Package Contents”

7. Open the .vmx file (in my case, WindowsXP.vmx) in your favourite text editor, and add the following at the bottom:

ide1:1.present = "TRUE"
ide1:1.fileName = "/Volumes/DATA/VMware/External/external_drive.vmdk"
ide1:1.redo = ""

8. Save and close the file, and start VMWare. Your external drive should now show up in the virtual machine.

Be aware that the .vmdk file is specific to the drive it was built against. If you have several external drives, you’ll have to create a .vmdk file for each. Also be aware that the .vmdk file contains the /dev/disk4 (or similar) device name. If you have two or three external discs plugged in at random, the device names might changed, so you may have to edit the .vmdk file too.

Today my SuperDuper! backup failed, complaining about disc space. The log showed the error occuring with a file under /.MobileBackups. Say what?

This turns out to be a feature of Time Machine in OSX 1.7 – Backups are made locally in addition to your external drive. I don’t want this behaviour, so I disabled it:

sudo tmutil disablelocal

Simples ;)

Microsoft’s Office 2011 for Mac leaves behind files in a number of places. When removing it, say to upgrade or downgrade or just re-install, it is good to remove all the left overs and start fresh. Here’s the quick and dirty of what to do.

Start by closing all MS Office components. If you’re reading my blog, you probably don’t need me to give you step-by-step instructions to do this through Finder. You can just copy the following into a terminal and be done with it. (Disclaimer: there may be mistakes):

sudo rm -rfv /Applications/Microsoft\ Office\ 2011
sudo rm -rfv /Library/LaunchDaemons/com.microsoft.office.licensing.helper.plist
sudo rm -rfv /Library/PrivilegedHelperTools/com.microsoft.office.licensing.helper
sudo rm -rfv /Library/Preferences/com.microsoft.*
sudo rm -rfv /Library/Application\ Support/Microsoft
sudo rm -rfv /Library/Receipts/Office2001_   #may not exist
sudo rm -rfv /Library/Fonts/Microsoft
sudo rm -rfv /private/var/db/receipts/com.microsoft.office.*
rm -rfv ~/Library/Preferences/com.microsoft.*
rm -rfv ~/Library/Preferences/Microsoft
rm -rfv ~/Library/Application\ Support/Microsoft
rm -rfv ~/Documents/Microsoft\ User\ Data

You’ll have to re-do the last four lines as each user, if you have multiple users on your Mac. Once you’re done, remove the icons from the Dock, and (because this is Microsoft after all) reboot!

I recently purchased an Asus EeePC 1201N for the purpose of running OS X Snow Leopard, Windows 7 and some flavour of Linux.  Each OS has a different purpose.  I’ve been looking for a lightweight laptop to take with me when travelling, specifically for the purpose of importing my photos, geotag them and keyword them while things are fresh in memory.  Aperture is my tool of choice, so I needed something with enough oomph and a decent enough display.   Windows is purely to get to know it, as I haven’t touched it since XP days, and I’m getting rusty.  Linux is what I use at work, and what I use for a lot of things outside of my day job.

As you might know, the wireless card in the 1201N doesn’t work in OS X, and the Dell 1510 card is widely recommended.  It uses a Broadcom BCM4322 chip, which works natively in OS X.  Unfortunately Broadcom chips tend to be somewhat shaky in Linux, unless you go with ndiswrapper for driver support, which wouldn’t work for my needs, so I had to look for something else.

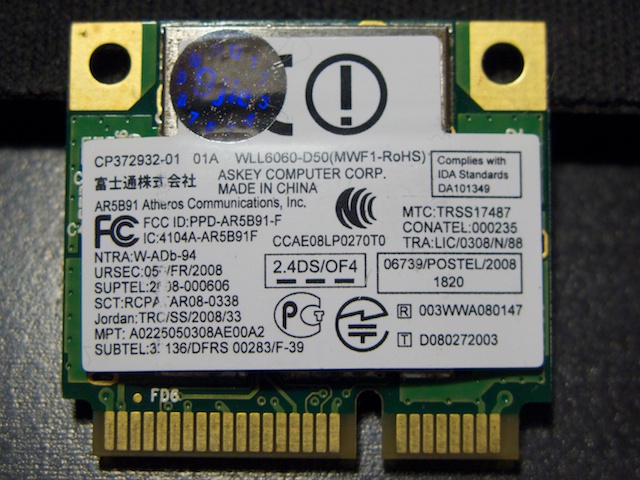
Things are further complicated by the 1201N using a low-profile Mini-PCIe card.  There aren’t too many of them around, and finding one that has good driver support in both OS X and Linux, wasn’t easy.  Fortunately I stumbled upon a card based on the Atheros AR5B91 chip, which I know will work in Linux, and works natevly in OSX.

Front:
Atheros AR5B91 Mini-PCIe Wireless card

View full article »

Have you ever been frustrated when trying to find a hidden file, or a file in a hidden directory, from an application’s open dialog? I’ve run into this a few times when trying to open disc images from disc utility. There’s an easy solution: browse to the directory where the hidden file/directory is, and hit:

Command-Shift-. [period]

This will show the hidden files. Hitting the same combination again hides them again. This might not work, depending on your region settings or key bindings. Try Command-Shift-, [comma] instead.