Category: hacks


One of my frustrations since moving from using VMWare Workstation on a Linux desktop to using VMWare Fusion on a Mac, is the inability of the latter to select a physical device as a hard drive. For example, in VMWare Worsktation I could select, say, /dev/sdc as a disc device, which would allow me to boot off an external disc, or run a bootable diagnostic CD on the OS drive for another computer, for example a laptop that doesn’t have a optical drive.

But fear not: VMWare Fusion can deal with raw discs. It just doesn’t have the option in the graphical user interface. Here’s what to do:

1. Plug in the external disc and open Disc Utility.

2. In the left hand pane, click on the external disc entry, then click on info

3. Look for the “Disk Identifier” field and note the value. In my case, it is “disk4”

4. The next step requires that you know where your VMWare Library is stored. In my case, I have two drives in my Mac, and the second is where my VMWare resides, so /Volumes/DATA/VMWare. I created a subfolder for external discs, /Volumes/DATA/VMWare/External.

5. Armed with the information discovered in steps 3 and 4, open the terminal and run the following (all in one line):

/Applications/VMware\ Fusion.app/Contents/Library/vmware-rawdiskCreator create /dev/disk4 fullDevice /Volumes/DATA/VMware/External/external_drive ide

6. Make sure VMWare is closed. In Finder, open your VMWare library, right click on your virtual machine file (in my case WindowsXP), and choose “Show Package Contents”

7. Open the .vmx file (in my case, WindowsXP.vmx) in your favourite text editor, and add the following at the bottom:

ide1:1.present = "TRUE"
ide1:1.fileName = "/Volumes/DATA/VMware/External/external_drive.vmdk"
ide1:1.redo = ""

8. Save and close the file, and start VMWare. Your external drive should now show up in the virtual machine.

Be aware that the .vmdk file is specific to the drive it was built against. If you have several external drives, you’ll have to create a .vmdk file for each. Also be aware that the .vmdk file contains the /dev/disk4 (or similar) device name. If you have two or three external discs plugged in at random, the device names might changed, so you may have to edit the .vmdk file too.

The other day, I encounetered a problem where Plesk would fail to save settings from the Web Hosting Settings page, giving only this error:

Error: Unable to update hosting preferences: hosting update is failed: webstatmng is failed –unset-config –domain-name=Domain name –stat-prog=

Rather uninformative, but it turned out to be fairly simple. The box had been upgraded from Plesk 7.5.4 to 9.5.4, and it seems something went wrong in the psa database:

# mysql -u admin -p`cat /etc/psa/.psa.shadow` psa -e "SELECT d.name, h.webstat FROM hosting h, domains d WHERE dom_id=id AND name = 'example.com';"
+-------------+---------+
| name        | webstat |
+-------------+---------+
| example.com |         | 
+-------------+---------+
1 row in set (0.00 sec)

To remedy this, run the following MySQL query. Replace ‘none’ with ‘webalizer’ or ‘awstats’ where desired:

# mysql -u admin -p`cat /etc/psa/.psa.shadow` psa -e "UPDATE domains d, hosting h set h.webstat='none' WHERE h.dom_id=d.id AND d.name='example.com'"

Or if you have more than one domain that has this problem, run the follwing to change all the empty webstat fields to ‘none’:

# mysql -u admin -p`cat /etc/psa/.psa.shadow` psa -e "UPDATE hosting SET webstat='none' WHERE webstat = '' "

Now, you can go back to Plesk’s Web Hosting Settings page and save your settings.

Every now and then I encounter a server that have multiple external drives attached to it. When the server is rebooted – let’s say we just updated the kernel – it sometimes happens that the external drives don’t get assigned the same device numbers they had before. This, in turn, means that we can’t mount them the old way, i.e. by device number, via /etc/fstab.

Fortunately, there are alternative ways of doing this. Let’s start by finding out the filesytem ID.

For ext2/3/4, do:

# dumpe2fs /dev/sdb1 | grep UUID
dumpe2fs 1.39 (29-May-2006)
Filesystem UUID:          5fbb68f9-86af-4784-bdb3-3ab452a5f263

For reiserfs, do:

# debugreiserfs /dev/sdc1 | grep UUID
debugreiserfs 3.6.21 (2009 www.namesys.com)

UUID: aa3c3244-83c2-491e-bab5-067c5e73ce9c

For xfs, do:

# xfs_admin -u /dev/sdc1 
UUID = 0d4139ef-db18-417c-8dc0-273f94acfa3a

JFS, as far as I can tell, does not automatically generate a UUID when you create the filesystem. You have to do it.

# jfs_tune -U random /dev/sdc1 
jfs_tune version 1.1.12, 24-Aug-2007
UUID updated successfully.

Now, to view the UUID, do:

# jfs_tune -l /dev/sdc1 | grep UUID
File system UUID:       cab1b11d-1f09-4dc6-aec8-b84537ff895f
External log UUID:      b02579b7-0100-0000-0000-000001000000

Now, adjust your /etc/fstab:

#/dev/sdc1                                 /backup   ext3  defaults 0 0 
UUID=b7bcf64a-e172-42ce-8ce7-12365cc72c6c  /backup   ext3  defaults 0 0

This will ensure that each filesystem is mounted in the right place, even if the device names come up in the wrong order.

I recently purchased an Asus EeePC 1201N for the purpose of running OS X Snow Leopard, Windows 7 and some flavour of Linux.  Each OS has a different purpose.  I’ve been looking for a lightweight laptop to take with me when travelling, specifically for the purpose of importing my photos, geotag them and keyword them while things are fresh in memory.  Aperture is my tool of choice, so I needed something with enough oomph and a decent enough display.   Windows is purely to get to know it, as I haven’t touched it since XP days, and I’m getting rusty.  Linux is what I use at work, and what I use for a lot of things outside of my day job.

As you might know, the wireless card in the 1201N doesn’t work in OS X, and the Dell 1510 card is widely recommended.  It uses a Broadcom BCM4322 chip, which works natively in OS X.  Unfortunately Broadcom chips tend to be somewhat shaky in Linux, unless you go with ndiswrapper for driver support, which wouldn’t work for my needs, so I had to look for something else.

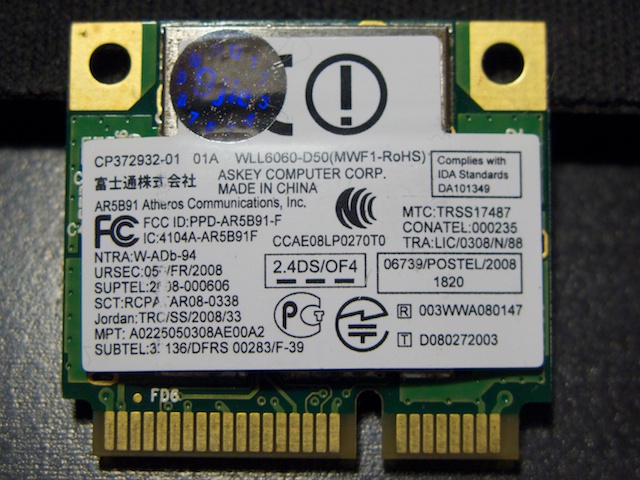
Things are further complicated by the 1201N using a low-profile Mini-PCIe card.  There aren’t too many of them around, and finding one that has good driver support in both OS X and Linux, wasn’t easy.  Fortunately I stumbled upon a card based on the Atheros AR5B91 chip, which I know will work in Linux, and works natevly in OSX.

Front:
Atheros AR5B91 Mini-PCIe Wireless card

View full article »

I encountered this today when trying to query a package on a Red Hat server:

rpmdb: Lock table is out of available locker entries
error: db4 error(22) from db->close: Invalid argument
error: cannot open Name index using db3 – Cannot allocate memory  (12)

This happens when an operation involving the rpm db gets interrupted and the locks not cleared.  The solution is rather simple:

1.   Make a backup of /var/lib/rpm   (because you never know)

2.   rm /var/lib/rpm/__db.00*

3.   rpm --rebuilddb

You should have a working rpm databse now.

I came across an error after upgrading a Plesk server from 8.6 to 9.2.3:

# /usr/local/psa/admin/sbin/mchk --with-spam
==> Checking for: mailsrv_conf_init... ok
==> Checking for: mail_mailbox_restore... ok
==> Checking for: mailsrv_entities_dump... ok
==> Checking for: mail_admin_aliases... ok
==> Checking for: mail_auth_dump... ok
==> Checking for: mailman_lists_dump... ok
==> Checking for: mail_responder_restore... ok
==> Checking for: mail_drweb_restore... ok
==> Checking for: mail_kav_restore... not exsists
==> Checking for: mail_spf_restore... ok
==> Checking for: mail_dk_restore... ok
==> Checking for: mail_grey_restore... ok
awk: cmd. line:50: (END OF FILE)
awk: cmd. line:50: invalid char '�' in expression
unable to process "pop3d"
awk: cmd. line:50: (END OF FILE)
awk: cmd. line:50: invalid char '�' in expression
unable to process "pop3d-ssl"
awk: cmd. line:50: (END OF FILE)
awk: cmd. line:50: invalid char '�' in expression
unable to process "imapd"
awk: cmd. line:50: (END OF FILE)
awk: cmd. line:50: invalid char '�' in expression
unable to process "imapd-ssl" 

View full article »

I recently needed to do some testing with sending mail, and needed a host that would accept mails without asking questions, and just discard it. This turned out to be pretty easy with Postfix.   Starting with a fresh installation on Debian Lenny, add the following to /etc/postfix/main.cf:

# accept all mail
relay_domains = static:ALL
# then get rid of it
smtpd_end_of_data_restrictions = check_client_access static:discard

And before I even got to send a test mail, someone had beat me to it:

Jul  9 03:43:58 mx02 postfix/smtpd[13940]: 6BC681740FC: discard: END-OF-MESSAGE
from 114-45-59-8.dynamic.hinet.net[114.45.59.8]: <114-45-59-8.dynamic.hinet.net
[114.45.59.8]>: Client host triggers DISCARD action; from=<[email protected]>
to=<[email protected]> proto=SMTP helo=<98.129.169.123>

Yes, I probably should have firewalled out port 25…

TED + iTunes

Hours spent in front of the TV are essentially a waste of life for me.  But once in a while, something happens and my brain actually works for a few seconds.  On this particular occasion I was on the couch, TV blaring some insignificant noise at me, browsing on my laptop for my daily information overload.

I remembered that I wanted to check if TED has an rss feed.  Sure they do, so I subscribed using my rss reader.   Of course, this gave me 200+ updates, and while browsing through them, I noticed that they contained direct links to mp4 files.  Hey!  Wait a minute!  iTunes should be able to make sense of this feed!  So I tried it, and what do you know – I’m now subscribed to the TED’s videos.

So here’s the quick&dirty.  Navigate to http://www.ted.com.  Scroll down to the rss feed link.  Right-click on it and copy the URL.  Now open iTunes, click on “Advanced” –> “Subscribe to podcast” and paste the URL into the box.  And that’s it!  Sit back and let the videos come to you!   As a bonus, the videos are the right format for the iPhone.  My daily commute just improved a whole lot!

Update (2009/05/05): Of course, the next morning, with a fresh mind, I realised that the TED talks were available as a podcast on the iTunes store.

Today I got tasked with removing duplicate mails from a mail folder with over 100,000 mails in it.  Doing this from a mail client is so impractical, it’s not even worth giving any thought at all.  Fortunately, the mailbox is on a mail server using Maildir style mailboxes, so I knew this could be done with minimum effort.

I discovered the ‘reformail’ utility, part of courier-imap, and after a few trial runs, I settled on the following:

# cd /path/to/mailbox/Maildir/cur

# for i in `find . -type f`; do reformail -D 10000000 /tmp/duplicates <$i && rm $i; done


-D looks for, and deletes duplicates.

10000000 is the length of the temporary file where a list of message IDs will be written

/tmp/duplicates is the aforementioned temporary file.

The temporary file needs to be big enough to accommodate the message ID of each mail.  In this particular case, I have found the average length to be 54 characters, but I would suggest using around double that to be safe.  So adjust to your needs.

In a big mail folder, and especially on ext3, this will take a long time to complete.

From time to time,  Squirrelmail gives this error on a Plesk machine:

Error opening /var/lib/squirrelmail/prefs/default_pref
Could not create initial preference file!
/var/lib/squirrelmail/prefs/ should be writable by user apache
Please contact your system administrator and report this error.

Squirrelmail depends on safe_mode being off.  Let’s see if this is the case:

# grep ^safe_mode /etc/php.ini
safe_mode = On

Since this is a multi-domain system, we want to make changes only to the effected subdomain, in this case the webmail.* subdomain.  But changing the Plesk config won’t help, since Plesk will just overwrite it.   So we create a second file, that will load after, and thus override the Plesk file:

# vi /etc/httpd/conf.d/zz011_squirrelmail_safemode_fix.conf

And add the following:

<Directory "/usr/share/squirrelmail">
     php_admin_flag safe_mode off
</Directory>

Now check your apache config and restart gracefully:

# httpd -t
OK
# apachectl graceful

You may also need to set the following in /usr/share/squirrelmail/config/config_local.php

$default_folder_prefix = 'INBOX.';

Reload Squirrelmail in your browser – it should work now